Dockerized Pi-hole for easy network-wide ad-blocking
Intro
Pretty much everyone, who is tech inclined, blocks their ads nowadays. But what if you could block all the ads on all the browsers on your whole internal network? Including those pesky mobile phones? Enter: pi-hole! Pi-hole works as a DNS server, blocking all pesky DNS queries to URLs that smell like advertisements. With the containerized version of pi-hole you are not only restricted to RPis, but you can run the setup just about everywhere you can run a container in.
I’ve used Pi-hole for some time in my network, running on a Raspberry Pi 3. For a small afternoon project I wanted to put it on a container, for portability and just for the joy of tinkering. I’ll explain the process on this blog post.
My full configuration can be found from Gitlab.
TOC
Requirements
- A RPi. Tested on RPi 3B, but I guess it can run on older Pis also, definitely on newer
- SSH enabled or local session where you can play around
- A static IP configured either on the RPi or the network (your router, most probably)
Set-up
Docker
Let’s (lazily) install Docker:
curl -sSL https://get.docker.com | sh
and add it to the docker-user group to run docker without sudo:
sudo usermod -aG docker pi
aaand also docker compose, bc that’s what we are going to use:
sudo apt install docker-compose -y
Pi-hole
There is a really good docker compose example on the docker-pi-hole repo. There is also a bash script version of running plain docker, but my sympathies are on the docker compose, so that’s what we’ll use.
Mine ended up looking like this:
version: "3"

# https://github.com/pi-hole/docker-pi-hole/blob/master/README.md

services:
  pihole:
    container_name: pihole
    image: pihole/pihole:latest
    # For DHCP it is recommended to remove these ports and instead add: network_mode: "host"
    ports:
      - "53:53/tcp"
      - "53:53/udp"
      - "67:67/udp"
      - "80:80/tcp"
      - "443:443/tcp"
    env_file:
      - WEBPASSWORD.env
    environment:
      TZ: 'Europe/Helsinki'
      # Elisa / Saunalahti DNS addresses
      DNS1: '193.229.0.40'
      DNS2: '193.229.0.42'
      ServerIP: '192.168.1.242'
      # Name "raspi" used on local network
      VIRTUAL_HOST: 'raspi'
    # Volumes store your data between container upgrades
    volumes:
      - './etc-pihole/:/etc/pihole/'
      - './etc-dnsmasq.d/:/etc/dnsmasq.d/'
      # run `touch ./var-log/pihole.log` first unless you like errors
      # - './var-log/pihole.log:/var/log/pihole.log'
    dns:
      - 127.0.0.1
      - 1.1.1.1
    # Recommended but not required (DHCP needs NET_ADMIN)
    #   https://github.com/pi-hole/docker-pi-hole#note-on-capabilities
    cap_add:
      - NET_ADMIN
    restart: unless-stopped
Basically my edits to the original were:
- Elisa (my internet provider) DNS addresses (
DNS1&DNS2) and - for accessing the actual service, the local name
raspiand it’s ip-address (VIRTUAL_HOST&ServerIP) WEBPASSWORD-env on a separate file, so the config can be pushed to gitlab (contents of the file are justWEBPASSWORD=password)
After configuration just run
docker-compose up -d
to get your new service up and running.
Simple stuff!
About config modifications
When you first run the docker-compose up docker creates local volumes and puts all the configuration inside. In order for you to alter these settings, put the service down with docker-compose down, clean the paths and start anew with docker-compose up.
Automations
The pi-hole docker -repo gives ready made recipes for automatically updating the ad sources once a week and flushing the logs:
# Pi-hole: Update the ad sources once a week on Sunday at 01:59
#          Download any updates from the adlists
59 1    * * 7   root    PATH="$PATH:/usr/local/bin/" docker exec $DOCKER_NAME pihole updateGravity > /dev/null

# Pi-hole: Flush the log daily at 00:00 so it doesn't get out of control
#          Stats will be viewable in the Web interface thanks to the cron job above
00 00   * * *   root    PATH="$PATH:/usr/local/bin/" docker exec $DOCKER_NAME pihole flush > /dev/null
and as in the dockerfile it’s defined --restart=unless-stopped the container should get up on boot and/or crashes. Magics!
Putting your new DNS server into use
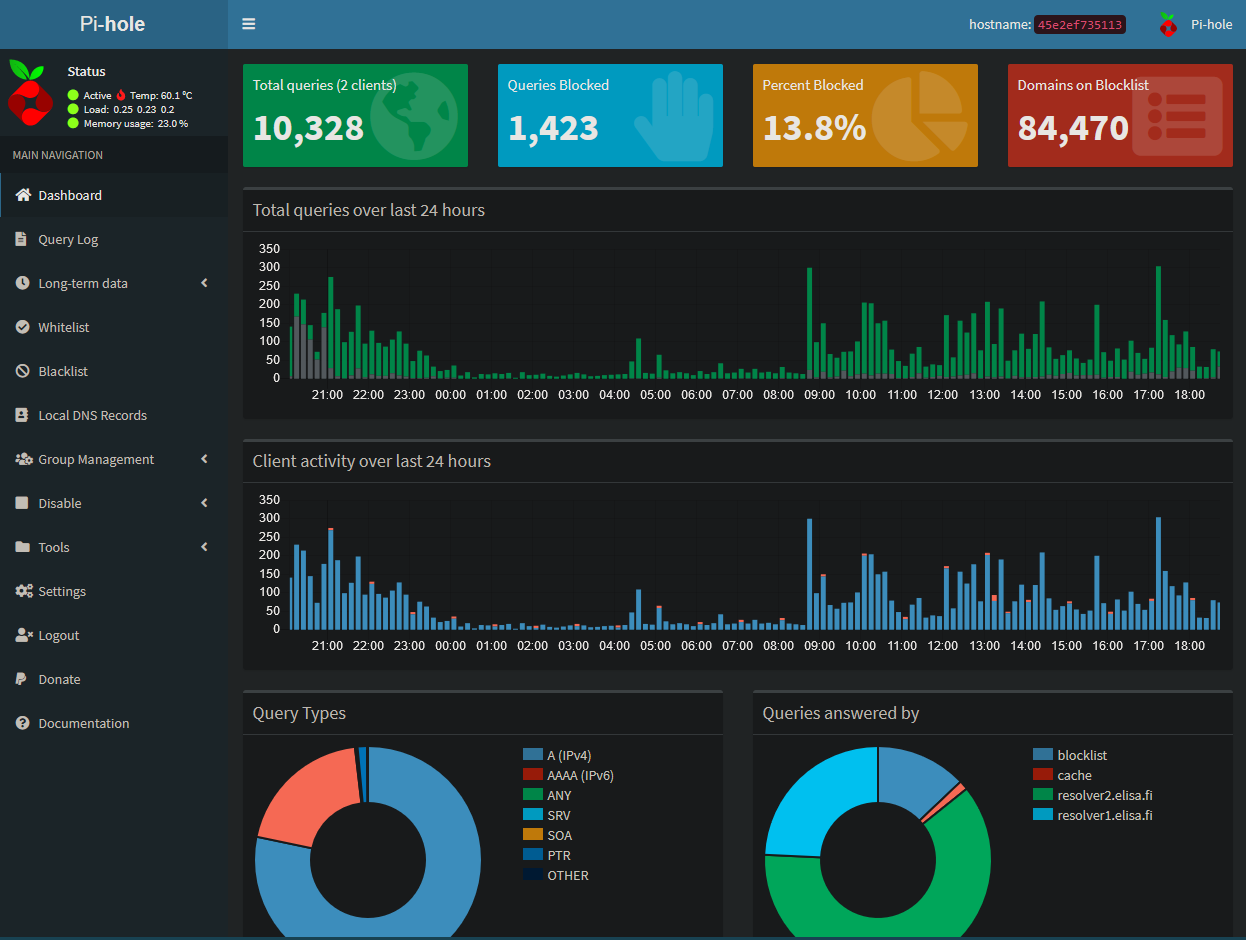
By itself the pi-hole does absolutely nothing other than displays a nice UI.
You might want to start by setting one workstation/appliance to use your raspberry as your DNS server and watch the blocked sites number going up. Maybe even visit your most used sites to check if the pi-hole has any negative effects on them. Personally I’ve had to whitelist only crunchyroll which didn’t work with pi-hole, otherwise the effects have been only positive.
When you are ready, go to your router’s settings and define your pi-hole as your primary DNS server for network-wide ad-blocking. If you don’t want your whole network to go down if the pi-hole does, put some secondary DNS-server as a backup, such as 1.1.1.1 or your internet service provider’s one.
Setup-wise you are now done, your life should be (more) ad-free than earlier.
Updating the pi-hole
Every now and then there is a notification on the UI of components of pi-hole that need to be updated, and we should as it’s our NDS and we want it to behave nicely. As the setup is on a container, the update consists of replacing the image with a newer one.
- Download the latest version of the image
docker pull pihole/pihole
- Throw away your container
docker rm -f pihole
- Get your service back running
docker-compose up -d
Bonus Fiddling
RPi USB Boot
RPis from B onwards support USB-boot meaning that you can ditch the most fragile part of your raspberry-setup, the SDHC card, and run the setup with some leftover SSD/HDD. I just happened to have one (actually 4) SSD lying around and I got a cheap USB-SATA-adapter off Amazon, which should have worked, but of course didn’t. It did work when mounting on up-and-running raspberry but didn’t work at all on boot.
What did work though was some WW2-era Lacie USB2-HDD, which I proceeded to gut and replace the old HDD with a bit newer SSD
 .. and it worked. And I was really surprised.
For the actual how-to on enabling the USB-boot just read the official documentation, it’s really good.
Windows 10 update notifier
Wouldn’t it be really cool to know when your pi-hole would be ready for updates? With Windows 10 notifications & WSL?
Well, it totally felt good at the time.
-
Install BurntToast on the Windows 10 to have a tool to actually do notifications that appear in the notification center.
-
Write a nice script for sending messages from WSL:
#!/bin/bash
MSG=$1

powershell.exe "New-BurntToastNotification -Text \"$1\""
maybe call it send-message.sh
- Write another nice script to do the whole “is there a new script yet”-dance
#!/bin/sh

if ssh raspi pi-hole/update-image.sh| grep 'Image is up to date'; then
        ALSA=1
else
        echo 'New image found'
        echo '-> notify'
        ./send-message.sh "New pi-hole image downloaded!"
fi
where raspi is the name of my pi-hole raspberry
- Schedule a task in Task Scheduler to run your check periodically, with path to your wsl.exe on the program and the path of your checker-script as the argument
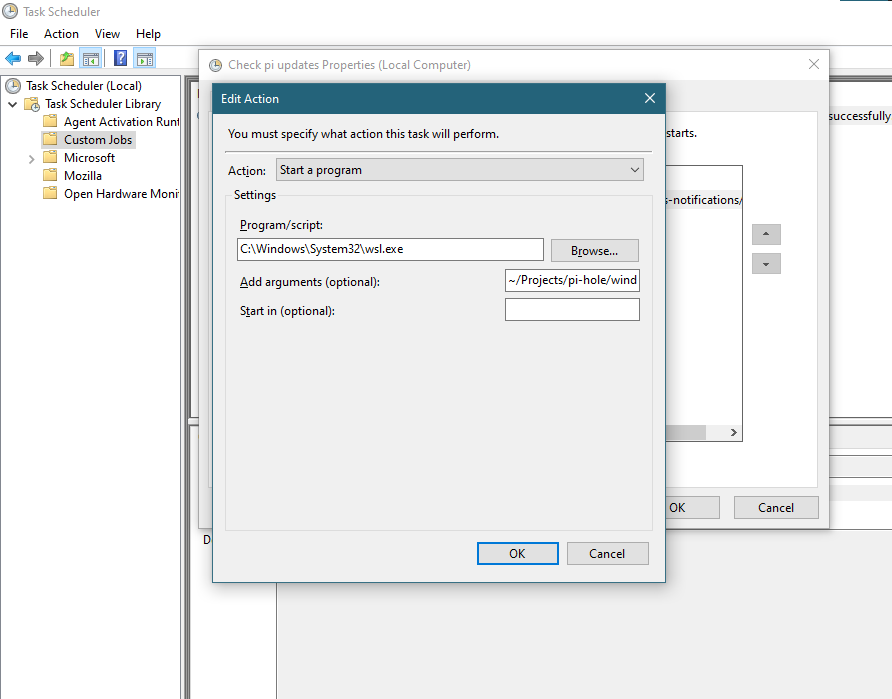
Note: do yourself a favor and create a new folder for your Custom Jobs so you can find them afterwards.
Things getting out of hand
At this point I decided that it would be really good if I could update my pi-hole automatically and get notifications of those actions on Telegram, instead of Windows, and it would be really beneficial to know if the pi-hole goes down at some point.
So I needed an infrastructure monitor on my LAN. And that’s the beef of my next blog post.